I'll hopefully have another post on lighting volumes soon but till then, a scribble!
Showing posts with label rust. Show all posts
Sunday, 15 May 2011
Wednesday, 6 April 2011
FXAA part 2
Some tests with the higher quality FXAA shader which you can read about here. These are mostly old screenshots that have been processed with the shader running in RenderMonkey. The console version I used in the previous post is good but this version is really working some magic :) Many thanks to Timothy at NVIDIA for making it available.
And some full screen examples...
Labels:
anti-aliasing,
fxaa,
rust
Monday, 4 April 2011
FXAA
I'm getting some good results with the FXAA shader code that was recently posted by Timothy Lottes so I thought I'd post the results. These pics are taken from RenderMonkey, using screen shots from the render engine I'm working on.
The post process sharpening filter I'm using in the last two examples seems to lead to images that look a little too soft by comparison. I might need to rethink how / when I apply the sharpen filter, doing it before applying FXAA probably isn't the best idea :)
Here are some full screen examples, the museum examples are the same ones seen in this post.
(Click for hi res versions)
Labels:
anti-aliasing,
fxaa,
rust
Saturday, 2 April 2011
Old depth of field tests
I don't have much spare time these days so I'm raiding the vault for this post :) These are some old post process depth of field tests I did ages back. It's quite an expensive method so I've held off implementing it in the engine so far. I rendered the source colour and depth images in Mental Ray and used Render Monkey for these tests. The images below show the effect of moving the focal plane through the scene.
(click for hi res versions)
The source images: A linear space colour image and scene depth, both 16 bit.
Sunday, 27 February 2011
Crash site - test shots
I've been working on matching the look of an earlier concept piece and these look development renders so I thought I'd post some results. I've added some basic fog to the static and skinned model shaders but apart from that the engine is unchanged. The colour correction system is doing most of the work in these shots and it's a lot of fun to work with. I think I've matched the overall look and I'm happy with the monoliths but the crashed pod isn't really working for me yet.
White diffuse lighting shots...
... and some alternate colour grading look tests. It's far too easy to get carried away and this was one of the tamer efforts :)
White diffuse lighting shots...
... and some alternate colour grading look tests. It's far too easy to get carried away and this was one of the tamer efforts :)
Labels:
light volumes,
rust
Saturday, 22 January 2011
Rust teaser (sort of) Part II
So my initial plan with the clip I posted last week was just to record a short sequence of the character I've been working on walking around, with everything lit by light volumes, and then do a write up on what had gone into making the sequence. I ended up getting carried away with the sequence and ran out of time so here's the write up!
Main Character
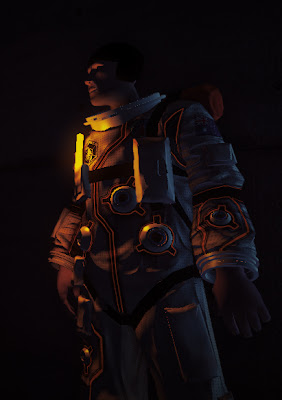
I've made some good progress on the main character but there's still a fair bit to do. I'd say the model is mostly done but the texture still needs work. Areas like the straps, hands and head haven't really been worked on yet so the texture you see here is pretty much a test run.
Still, I like where it's headed and it's been great to get a more complex model in to replace the robot I'd previously been using.
I thought I'd include an offline render of the high poly model as well (right). I haven't done much high poly character work to date so there's definitely been a learning curve but I'm happy with how the model is evolving.
Main Character
I've made some good progress on the main character but there's still a fair bit to do. I'd say the model is mostly done but the texture still needs work. Areas like the straps, hands and head haven't really been worked on yet so the texture you see here is pretty much a test run.Still, I like where it's headed and it's been great to get a more complex model in to replace the robot I'd previously been using.
![]() |
Fun with deferred light types
I'd always planned for the character to wear some sort of light source and for lots of reasons but primarily it just looks cool. It's hard to think of a sci-fi film where the suits don't have some sort of moody light source (often blue) located just under the actors jawline so I wasn't about to buck the tradition :)
I wanted the light source to realistically illuminate both the character and the environment but it was hard to get both those properties without resorting to shadow maps. I thought I'd approach it slightly differently so I ended up using a single light source with two falloff factors (left). An omni directional, short range falloff provides local lighting to the character without affecting areas it shouldn't (like the opposite side of the body) whilst a hemispherical , medium range falloff illuminates the nearby environment.
Post Process Colour Correction
This has been on my list of things to try out for quite a while now so it was great to finally get it implemented. There aren't many resources on how this should be done but I think that's mostly due to it being quite a straightforward process. Using a pixels RGB value as a texture coordinate you simply sample a 3D texture containing the colour correction information. The image shows a few examples.
This opens up a massive range of colour correction options and any number of software packages can be used to create the 3D look up textures, often referred to as LUTs. The process is largely the same regardless of the software used and involves colour shifting both a reference image (usually an uncorrected screenshot of the game) and a flattened version of the LUT. The altered LUT is then sampled at runtime, reproducing the colour alterations made to the reference image. Below you can see how the sequence looked before and after colour correction with the flattened LUTs as overlays.
That's all folks
To wrap up I thought I'd post some un-textured shots of the scene as they always do a good job of showing off the lighting volumes.
Labels:
colour correction,
light volumes,
post process,
rust
Sunday, 16 January 2011
Rust teaser (sort of)
Okay so this isn't really a teaser, think of it more as a mood and lighting test maybe :) I'd initially just wanted a video of the starman character walking around a simple scene but I ended up getting carried away. The scene is loosely based on an existing piece of Tadao Ando architecture and not really indicative of where the project is heading, environment wise at least. The video was captured straight from the engine so editing aside I haven't done any additional post processing on the frames.
The audio samples used are by ERH and were obtained from the Freesound Project. The samples are used under the Creative Commons Sampling Plus 1.0 licence.
Labels:
rust
Thursday, 23 December 2010
Anti aliasing
I've wanted to implement some form of anti aliasing for a while now so I took a break from playing through the recent Humble Indie Bundle and looked into it. There are several different options when it comes to AA in deferred rendering so I've started with what seemed to be the easiest. The method I've used here is the one outlined in GPU Gems: Deferred Shading in Tabula Rasa and I haven't really deviated from that article with regards to AA.
I also took the opportunity to look into applying a post process sharpen to the overall image. The method is known as unsharp masking and it's an effect a lot of digital artists use to spruce up their images. It goes back further actually and I was surprised to learn that the technique was pioneered in conventional photographic darkrooms.
You can see some examples of AA and unsharp masking below. Be sure to view them full screen without any scaling as the difference is hard to spot when the images are down sampled. In some areas the sharpen effect over sharpens fine details and increases the aliasing problem although for the most part the effect is an improvement.
Fullscreen examples (click for larger versions)
![]() |
| With AA |
![]() |
| No AA |
![]() |
| With AA |
![]() |
| No AA |
![]() |
| With AA |
![]() |
| No AA |
Well that was fun, back to playing Cortex Command... sniping the engines off drop ships never get's boring ;)
Labels:
anti-aliasing,
light pre pass,
rust
Subscribe to:
Posts (Atom)


