Pages

Thursday 23 December 2010

Anti aliasing

I've wanted to implement  some form of anti aliasing for a while now so I took a break from playing through the recent Humble Indie Bundle and looked into it. There are several different options when it comes to AA in deferred rendering so I've started with what seemed to be the easiest. The method I've used here is the one outlined in GPU Gems: Deferred Shading in Tabula Rasa and I haven't really deviated from that article with regards to AA.

I also took the opportunity to look into applying a post process sharpen to the overall image. The method is known as unsharp masking and it's an effect a lot of digital artists use to spruce up their images. It goes back further actually and I was surprised to learn that the technique was pioneered in conventional photographic darkrooms.

You can see some examples of AA and unsharp masking below. Be sure to view them full screen without any scaling as the difference is hard to spot when the images are down sampled. In some areas the sharpen effect over sharpens fine details and increases the aliasing problem although for the most part the effect is an improvement.


Fullscreen examples (click for larger versions)


With AA
No AA


With AA

No AA


With AA
No AA


Well that was fun, back to playing Cortex Command... sniping the engines off drop ships never get's boring ;)

Monday 13 December 2010

Concept Art - Starman

It's concept time again :) This time around it's a concept for Rusts protagonist who for now I'm just calling the Starman. This is my second attempt at the character, you can (sort of) see the first version in this concept. That version was more futuristic looking but I like the lo-fi direction this is heading in, if you can call a space suit lo-fi!
Like most of the concepts I've posted so far I started out with a 3D render, which you can see below. I often find this to be the fastest way to work as it gives you a very solid base to start from.

Monday 6 December 2010

SSAO

I recently decided it was time to take another look at SSAO as it's a technique that should complement lighting volumes quite well. Due to their sparse nature lighting volumes don't provide mid/high frequency lighting detail so SSAO should help add some of that lost lighting detail back into the scene.

There's already been a heck of a lot written about SSAO and I don't have much more to add so my plan is to keep this post fairly brief. My first implementation attempts were several years ago now and although the results were okay the shaders were pretty complicated. They often involved sampling both normal and depth buffers, reconstructing 3D positions and also required lots of per pixel matrix multiplications. The technique shown here only requires a depth buffer and is quite straight forward to implement. You can read all about it in Rendering techniques in Toy Story III on the Advances in Real-Time Rendering in 3D Graphics and Games  SIGGRAPH 2010 page.

For these shots I'm using a total of 32 SSAO samples per pixel. If that gets to be too much of a frame rate killer I can dial it back but for now it's looking pretty good. The SSAO only affects the ambient light provided by the light volume, direct light remains unaffected.

Isolated SSAO


SSAO with light volumes


Full lighting with textures


The original museum model, complete with some awesome dinosaur skeletons which aren't featured here, was built by Alvaro Luna Bautista and Joel Anderson and can be found at http://www.3drender.com/challenges/. I also used some textures from the crytek sponza scene which you can grab here http://www.crytek.com/cryengine/cryengine3/downloads.

Monday 29 November 2010

Light Volumes - Natural History Museum

Moving on from the sponza scene I was keen to see how well lighting volumes would cope with a larger and more complex environment. The most complex scene I had to hand was this Natural History Museum model, more details of which can be found at the end of the post. I've been meaning to test Bluestone with this scene for quite some time so I thought I'd post the results.

After settling on a volume size of 128x64x64 it was then a case of finding and eliminating light leaks. This largely involves cloning walls and floors between areas of high contrast to prevent samples from bleeding. It's a pain but fairly straightforward and with a high enough volume density is only necessary in a few key areas. Where I to increase the volume size to 256x128x128 then the light leak issue would probably solve itself, shortly followed by sparks flying out of my graphics card.


For these shots I'm also trialling the use of six separate colours per voxel. In previous light volume posts I was storing one colour value and six luminance values. It remains to be seen if this approach will be practical in the long term but it definitely looks nicer. These screen shots are all taken directly from an XNA based rendering test bed. The test bed is largely unoptimised and was running the scene at about 20-30fps. 


The lighting volume was rendered in Bluestone and took about 12 minutes in total. As it's a light volume we have lighting information for the entire space so giant animated robots are easily supported...


...stay tuned for a video :)

The original museum model, complete with some awesome dinosaur skeletons which aren't featured here, was built by Alvaro Luna Bautista and Joel Anderson and can be found at http://www.3drender.com/challenges/. I also used some textures from the crytek sponza scene which you can grab here http://www.crytek.com/cryengine/cryengine3/downloads.

Wednesday 3 November 2010

Concept art - crash

Took a break from coding to do some concept work for Rust.

Sunday 31 October 2010

Bluestone GPU - Light volumes

Following on from my previous post I've been working with some of my old test scenes to see how well light volumes stack up against light maps. Obviously the resolution is no where near the same but the results are still pretty good.

Here I'm using the street scene again with three 32x64x32 volume textures to store indirect lighting for the entire scene. Light leaks do occur so I've had to resort to additional "blocker" geometry to help solve the problem. Thin double sided geometry like the hanging shades in this scene also pose a problem I've yet to tackle. Sample points close to this sort of geometry will need to be handled slightly differently.

Unlit scene showing offset volume samples.


The screenshot above shows the scene and each of the repositioned volume samples. Each line represents a volume sample which has been moved to a more suitable location. This also gives a good indication of the resolution of the light volume. In this scene, only the exterior surface geometry is set to distort the lighting volume. For more info see my previous post.

The video below shows the scene being rendered. Direct light is first rendered into lightmaps. This direct light is then sampled when rendering the indirect light volumes. Render times are as follows:

Direct light (light map): ~1.5 sec
Indirect light 1st pass (light volume): 3 seconds (512 rays)
Indirect light 2nd pass (light volume): 15 seconds (2512 rays)


Some additional screenshots as the video quality isn't the greatest...


Monday 25 October 2010

Light volume sampling

With Bluestone now running nicely under SlimDX I've turned my attention back to light volumes. After seeing how well the technique worked on the sponza scene I've decided to go with volumes over lightmaps for the project I have in mind.

The issue I've been looking at recently is how best to sample a light volume for a scene containing angled or curved geometry. This wasn't an issue with the sponza scene as it fit nicely inside a rectangular volume, it was enough to simply sample the scene at the centre of each light volume texel.


However, you quickly run into trouble with scenes containing curved or angled geometry. You can see in the image below that if we simply sample each volume texel centre we'll end up sampling “outside” the scene. This often leads to streaks and blotches and ends up looking pretty naff.


The problem is exacerbated by linear texture filtering when sampling the light volume. Incorrectly sampled volume texels can adversely affect their correctly sampled neighbours. It's identical to the problem caused by incorrectly padding lightmap textures, only now the problem is in three dimensions.

Overcoming sampling and linear filtering issues


The above two images show a cross section of a light volume texture. Imagine the red line is a wall, on one side the lighting values are dark, on the other, the light volume texels are not occluded and are now lit by the sky. The dots show the location of each sample. The image on the left looks fine, the geometry is completely covered by valid samples, on the right, we're already in trouble.

 Let's see what happens when the texture is filtered during lookup.


The light volume is leaking all over the place. If we were to view the scene in game the interior wall would have a noticeable blue glow but how do you fix that? In a lightmap it's fairly easy, you just copy and expand the border pixels of each UV chart. In a light volume though it's a bit harder.

In short, the way I've overcome the issue is to move the sample location of any invalid samples.


With the invalid samples moved to valid locations the light leaks have been removed. What constitutes an invalid sample and where to then move it is the topic of a whole other blog post :) But to wrap things up, here are some before and after shots. The lighting and AO for this scene was rendered in Bluestone in about 15 seconds. Direct light and AO are rendered into lightmaps, indirect light is rendered into the light volume.

Sample positions left untouched:

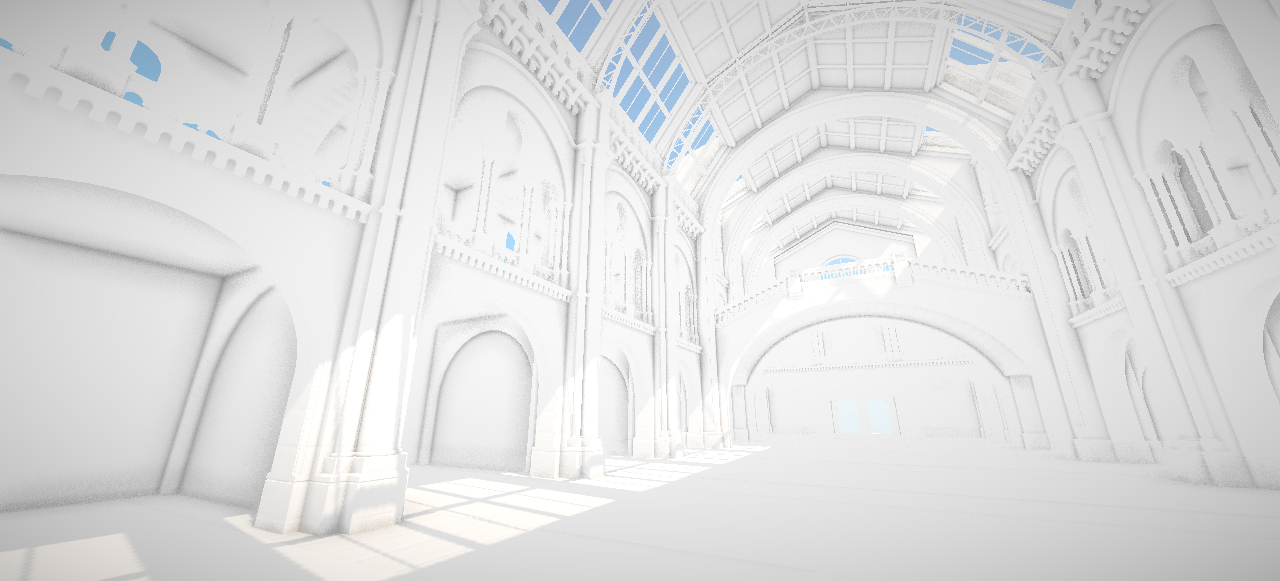
Sample positions fixed:


Another example (click for fullsize)